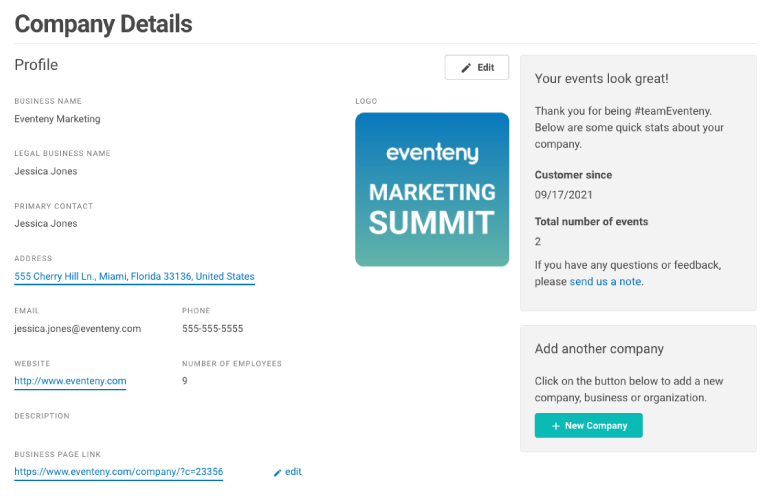
How to Set-up Your Company Profile on Eventeny
Locating Your Company Details
- Log in to Eventeny with your email and password.
- Click “My Events” in the navigation bar to be directed to your event dashboard.
- On the left-hand side click “Company Details.”

Filling Out Your Profile
To complete your profile, you’ll be asked to supply the following information:
- Business name
- Legal business name
- Primary contact name
- Upload a Logo
- Address
- Phone
- Website
- Number of employees
- Company description

Inviting Company Admins
Company admins are team administrators that have access to all the events under your company profile.- Locate the section “Company Admins” on the Company Details page.
- Click the “+ New Admins” button on the right-hand side of this section.
- Enter the email of the person you’d like to invite.
- Click “Submit”
- An automated email will be sent to them from Eventeny. The recipient must accept this invitation to gain access.
- If needed, you can edit or remove admin using the “edit” or “remove” buttons shown in the example below.
If you would like to restrict access to specific events, or sections of an event, learn how to add team members.

Adding Your Payment Method
It is very important that you set up your payment method first because all your applications will default to the payment method you set up here. To do so:- Locate the section “Payment Information” on the Company Details page.
- Click the “+ New Payment Method” button on the right-hand side of this section.
- Enter the credit or debit card number associated with your business.
- Click “Submit.”
The below example is not a real card number.

Adding Your Payout Method
To get paid, you need to set up a payout method. Eventeny releases payouts to your Stripe account immediately after payment is processed. The time it takes for the funds to appear in your bank account depends on your Stripe account configuration.
- Locate the section “Payout Preferences” on the Company Details page.
- Click the “+ New Payout Method” button on the right-hand side of this section.
- Stripe will automatically launch the setup. Follow the prompts presented to connect.
- After finishing, your payout preference should have a status that says “enabled” if the status shows “not enabled,” as shown below, click “Go to stripe account” to complete the necessary steps.


